There are a large number of companies out there selling a large number of different scanners employing all kinds of methods for 3D scanning. LIDAR scanners, structured light scanners, small laser scanners, mechanical arms with and without lasers attached, (semi-)automated photography sets capable of delivering 360° or freely rotable panoramas and photogrammetry-suited image sets – and what not. It’s a zoo out there. And any company you ask is 100% certain that one of their products offers the (in capital letters and bold type, underlined), THE perfect approach for your digitizing needs. Often at the cost of an arm, a leg and your firstborn (if you are so inclined; YMMV for those intent on remaining sine prole), but hey, whaddayawant? Do you want the perfect model created while you sleep or scratch the itch on your nose, then pay the price! And many out there are willing to pay up or stick it out with a DSLR and manual photogrammetry.
Well, not I! Not that I mind manual photogrammetry. My wonderful digiS 2015 project was all about manual, free-hand photogrammetry. Not even the luxury of a tripod was planned in (nor could it one have been used). And the models we create are beautiful, and over 90% of the photo sets are good enough to produce high-quality models: low-tech FTW!
On the other hand, I must admit that I am very glad that (contra initial plans) I didn’t have to photograph all the bones myself. Instead, much of the grunt work was done by two colleagues, Bernhard Schurian and Matteo Belvedere. And whoever of us went down to the dark and dank basement to photograph bones came back out an hour or two later with arms and shoulders hurting and sweat streaming down the face.
So, is there a middle ground? Can you do mass digitizing for a reasonable price? With sufficient flexibility that you can scan both small and big specimens, do not need a dedicated room, do not need days on end to set up equipment and take it down, and without the need to transport all your specimens to hell and back?
Here’s one way!
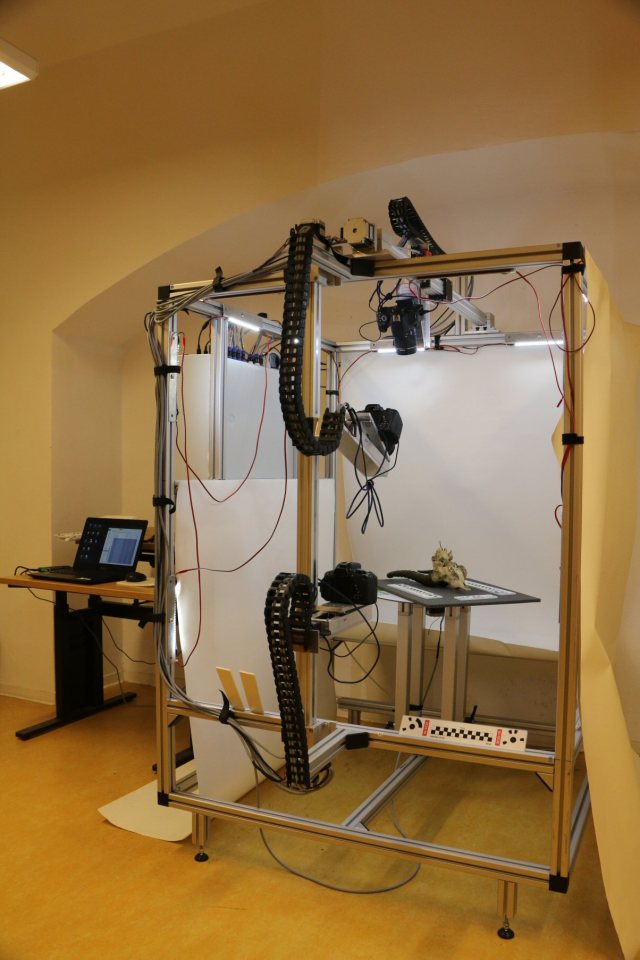
This is a photogrammetry rig that I designed, and that got turned from an idea and a sketch into a real, physical mechatronical system by engineers at Technical University Berlin. They deserve a huge lot of credit for their work, and also for programming a software that runs the entire thing!
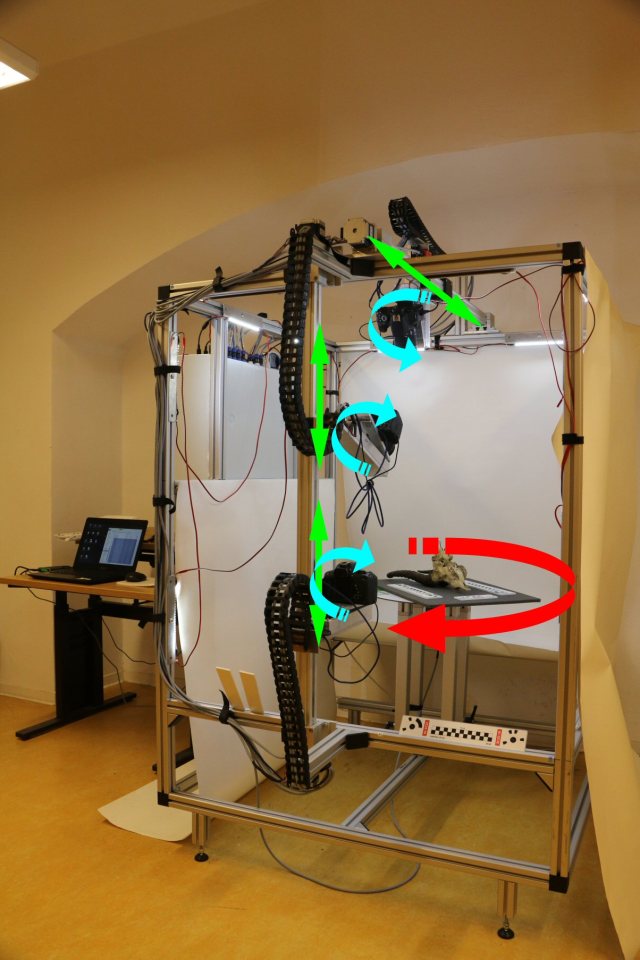
Essentially, it consists of three cameras that can move vertically (2) or horizontally (1) and can tilt, and a turntable. Below is an illustration that shows the degrees of freedom:
The entire thing is computer controlled, and built to be easy to use. “Easy” starts with the fact that there is a single power plug (so the cameras get their power from the system automatically), that the system has a built-in power socket for the laptop, that all cables only fit one socket each (so can’t mix them up), and that there is only one single screen of user interface you need. It turns on with the press of a single button, which also turns it back off if you press it again.
The photo above shows where all the cables come together. The camera tilt and camera move cables have different types of connectors, and simply won’t fit in the wrong place. As do all other rig-related cables, e.g. for the lights. The USB cables for camera data transfer are color-coded. I love it, as even I can mount all that stuff correctly on the first try.
Overall, the rig is built to be transportable. Not mobile, as in “let’s lug this to that room for 2 hours of work, then bring it back”. But you can take it down in an hour, and re-mount it in maybe 90 minutes. It is easy to work for a few days in one collection room, then move on to another. Saves a lot of time and bother you would have if you had to move specimen all over the place to bring them to the scanning station. Actually, any future versions will come in two or three boxes, as the complete rig is a tad too heavy to lug around.
The overall size is also adapted to typical museum needs. You can digitize specimen with a maximum length of somewhere between 5 cm (using macro lenses) and 1.2 m (using wide-angle lenses and with a bigger turntable cover than shown above), although I would recommend caution with stuff longer than 80 cm. This range covers the vast majority of specimens (except insects and small invertebrates) that you can actually move around – complete skeletons of large animals or sauropod femora are best digitized in place anyways.
So, how does this thing work?
In essence, what you do is this:
- place your specimen on the turntable (ideally on a bit of support material that is soft enough to protect the specimen and is slightly smaller than it – I’ll explain later why this is important),
- add scale bars,
- load a scanning script that matches the specimen’s characteristics, or create one,
- select a target folder for the data,
- click “start scanning”,
- and go and have a coffee or beer (depending on time of day).
Once the scan has finished, which can take two minutes or half an hour, depending on how many photos you ordered, you will find them in the folder you specified, ready to be tossed into a photogrammetry program.
So, how do I create a scanning script?
In essence, what you need to create is a tab-delimited CSV, which you can easily do in EXCEL or its OpenOffice equivalent. The first colum is the move command for the top camera, the second the tilt, the next two do the same for the middle camera, the next two the same for the bottom camera. The following column indicated the angle of rotation for the turntable, and then three columns contain the info if each camera is to take a photo at this step or not (a simple TRUE or FALSE entry). Here’s one:
This is a basic, standard scanning protocol for an object that is roughly box-shaped, with all sides of roughly the same length and thus fairly even changes of relief all around. As you can see, the bottom and middle cameras take a picture every 20°, but are offset from each other by 10° (alternative TRUE and FALSE values in the last two columns). The top camera takes fewer photos, one every 50° only. That’s because it is close to the “pole” of the specimen, where fewer photos are needed.
You may notice that in this very simple script none of the cameras move. That is intentional, as moving them takes time. Let’s take a look at a more complexly shaped object’s script:
Note the line where I added the red arrow! Up until there, everything is the same as above. Then, several things change.
First of all, the top camera goes off the air here. It took all the required images while the turntable goes through the first 350° of rotation.
Secondly, the bottom and the middle camera shift up quite a bit, but retain their respective down angles: the bottom one stay horizontal, the middle one stays angled down ca. 25° (10° form the script, plus the 15° is it mounted at).
The picture taking scheme stays the same: each takes a photo every 20°, and the two are offset by 10°.
What kind of object is this script for? Well, something that is much higher than wide, and is placed vertically on the turntable! Think of a bust with a high head. Or a mounted bird eagle skeleton.
What if you have an object that is much wider than long, but can’t be placed vertically? Something like a dinosaur femur? In this case, you’d alter the first scanning script so that the angles between photographs are smaller when the bone ends (with their high rate of shape change) face the cameras, and larger then the cameras are pointed at mid-shaft. And so on – depending on object shape you simply alter the script. And save it with a speaking name, so that you can easily call it up again when another, similarly shaped object needs to be scanned.
So, why this rig and not something off the shelf?
So far, all this is not very special. In the end, however, this rig is specially adapted for natural history museums with their collections that have objects varying widely in size and shape complexity, with their low budgets, and with their dearth of technical personnel: you can learn to scan with it very quickly, get excellent results, and that across or wide swath of objects typically found in collections. Also, the rig is not very expensive, but sturdy, and can be upgraded easily whenever you have money for new lenses or cameras. The model quality easily beats handheld laser scanners, btw….
Well, I’ll see what the institute that ordered it does with it – I’ll keep you posted!


Well, I am super jealous!
How about posting a short video of this machine in action?