Quite a while ago I mentioned that for fiscal year 2016 I again received funding from the Berlin digiS program. Whereas 2015 saw Bone Cellar material digitized, the linked post shows one of the the first results of the 2016 effort, which concerned the mounted skeletons in the MfN Berlin. And obviously, the elephant in the room – erhm, the biggest sauropod in the room! – is Giraffatitan!
The aim of the digiS-funded program was to obtain high-resolution 3D models of the mounts’ bones, not just of each bone individually, but also of their spatial relation. Which allows creation of a high-resolution complete model of each mount as it exists in the exhibition, but also allows for correction of the virtual mounts. Real mounts are suboptimal, because they need to contain armatures to hold the bones, and these get in the way of a perfect mount. And they may have errors simply because of human error, or because of deformed fossils, and whatnot.
Initially, as shown for the Kentrosaurus mount in the post linked above, I had planned to create overview models at low resolution, as well as detailed models of individual bones, or small groups of bones. The latter were then to be inserted into the overview models, aligned perfectly, and exported again. Thus, they would be aligned perfectly with each other, but there would be no need to load them all at the same time. That’s an important point, because 3D data gets awefully big awfully quickly, and that means computer crashes. Obviously, one can always downscale data, but with an animal that has some 300 bones and each bone resolved to only ca. 1 mm, that’s still talking gigabytes of data.
In the end, things partly worked this way, and partly worked differently. Here’s how things went down with Giraffatitan!

Yep, that’s the entire sauropod group in ONE model! This is the sparse point cloud, i.e.: the points used to align the images. Each small white point is one camera position. In preview quality there are a few more points, and Giraffatitan looks like this:

Not too shabby, I say!
Now for a high resolution…..

Thank you very much, this will do!
In fact, it does extremely well, as can be seen in a closer view! This model, which as an entirety shows all the sauropod mounts good enough for “overview quality” shows individual bones at a sufficient resolution to serve as a “detail” model! Photogrammetry has come a long way since the day I planned this project 🙂
What you see above is really three integrated data sets, the biggest of which is again a lumping of several sub-sets:
- overview images that show the entire mount
and
- close-up shots of the ribcage, shoulder girdle and hips,
  which are in fact
     close-up sets of
             - the shoulder girdle
             - the anterior ribs
             - the medial ribs
             - the posterior ribs
             - the ventral sides of the vertebrae
             - the dorsal sides of the vertebrae
             - the hip
             - the tail base
and
- overview images of the entire animal and the neck, shoulder girdle and back taken from a hydraulic lift.
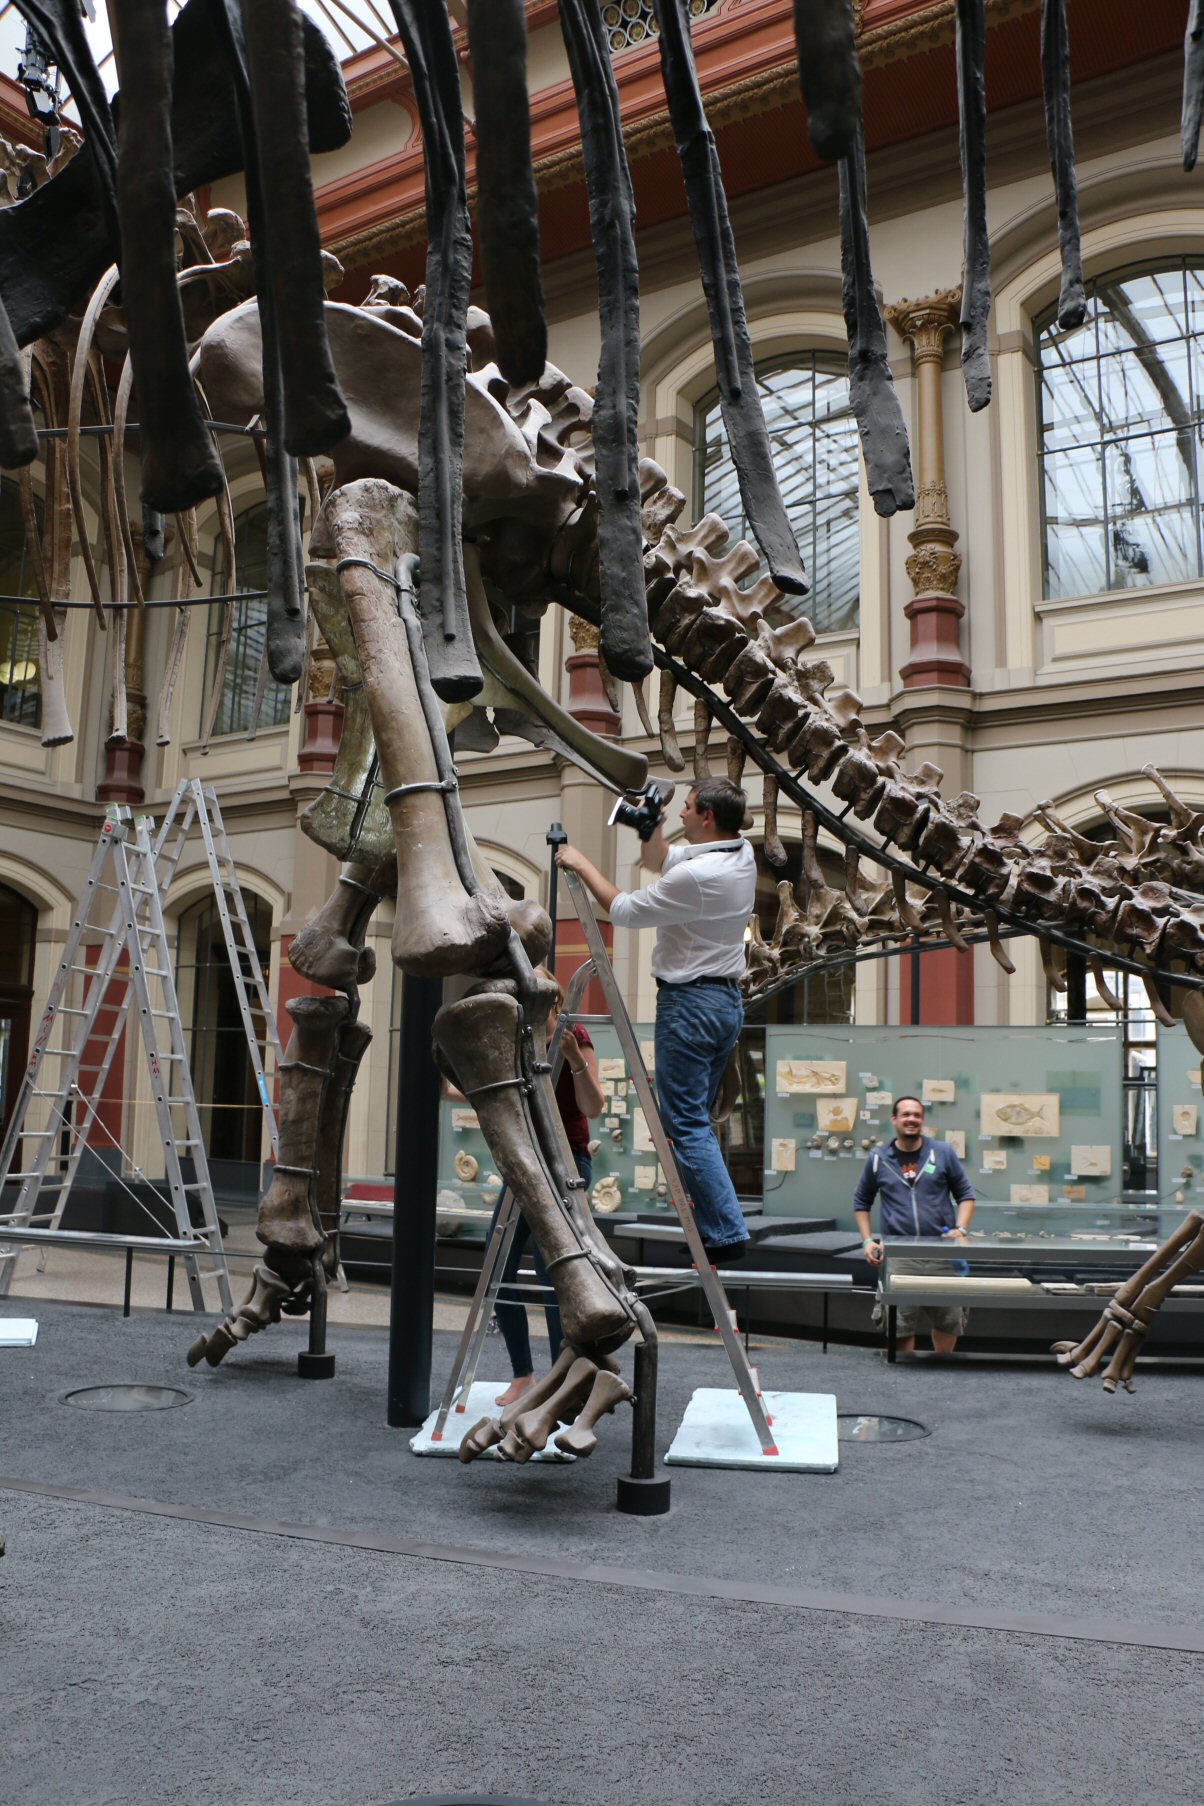
In fact, when we took the photos we sub-divided them even more, although it proved to be difficult to stay consistent when working high up on a ladder in a sauropod ribcage. Especially because the ladder couldn’t be placed on the ground normally, but had to be set on hard foam plates to cushion it, as the special floor cover under the sauropods is easily damaged. So it all felt a bit like a high wire act, surrounded by fragile and irreplaceable fossils *gulp*

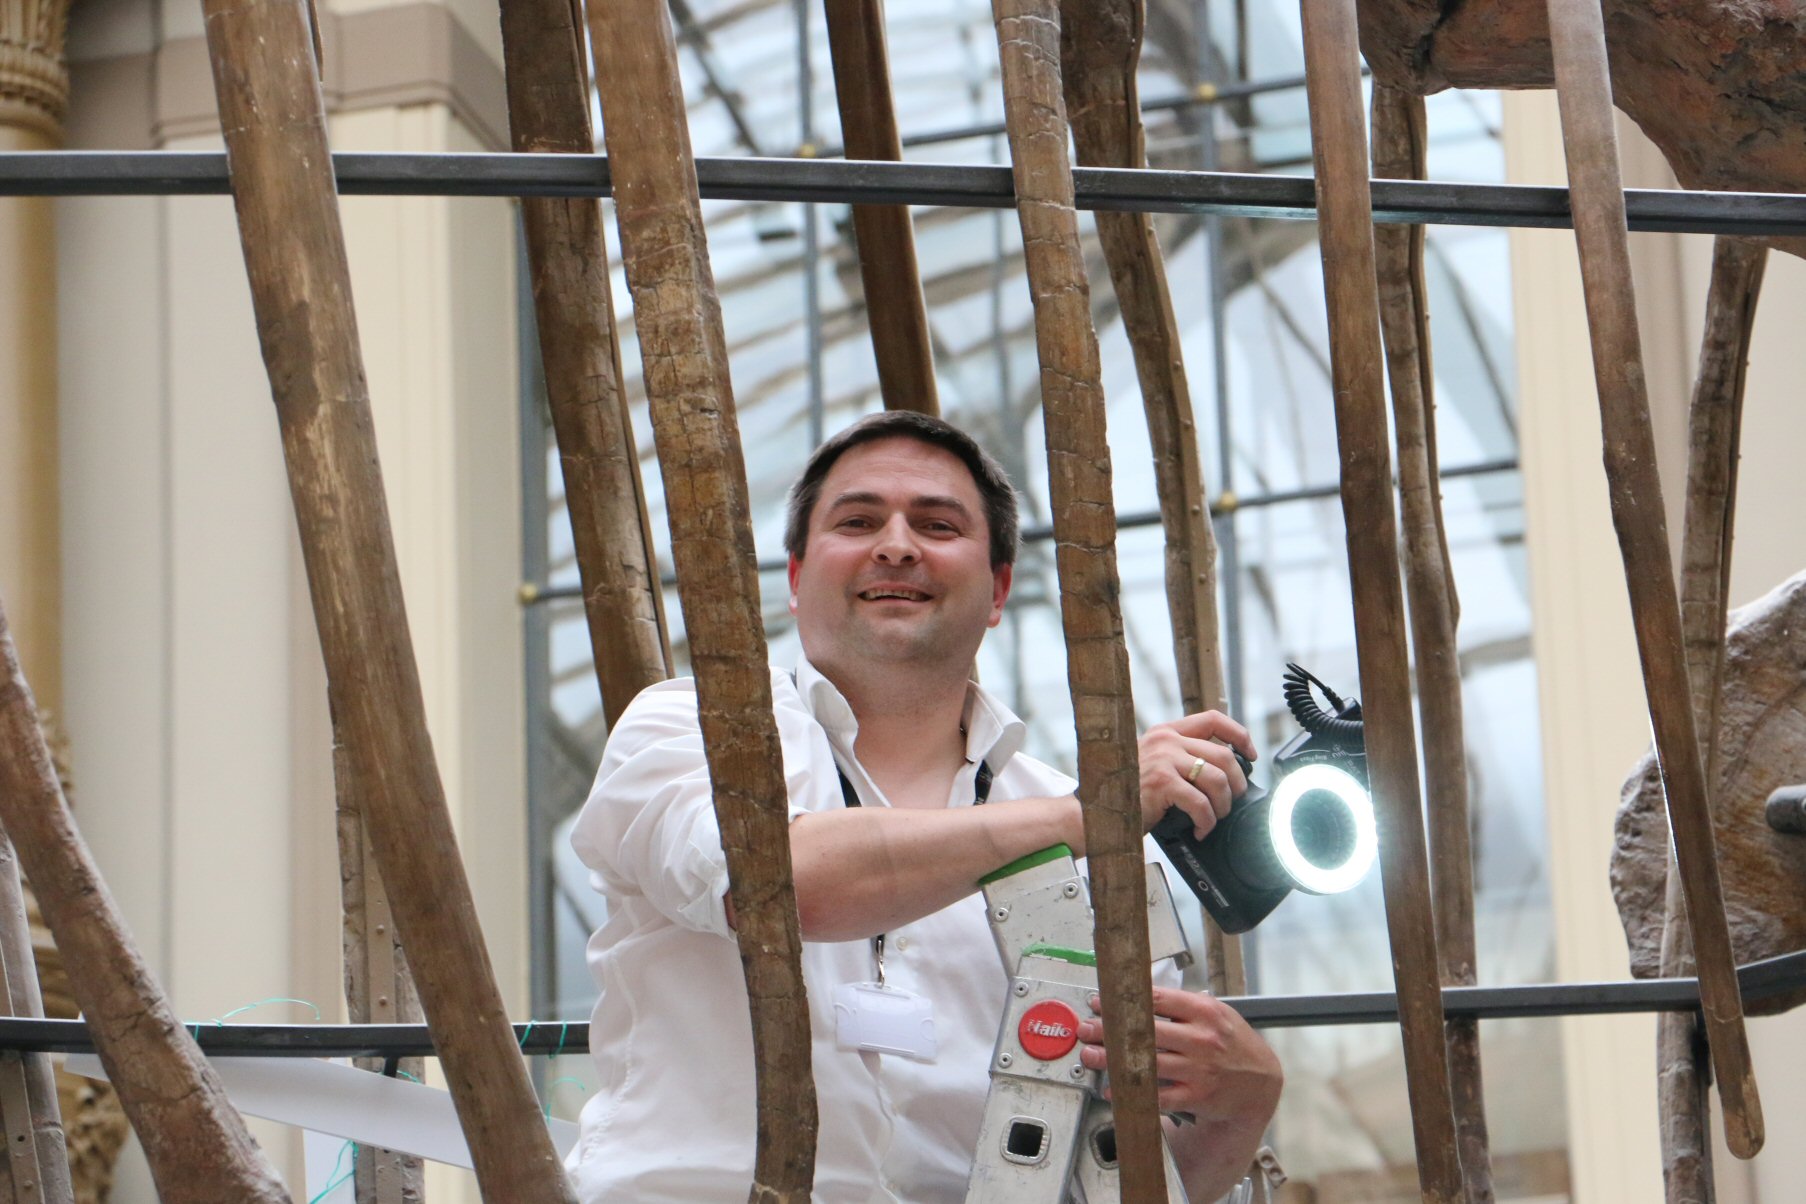
Here’s a shot of me sticking my camera up Giraffatitan‘s butt [the things we do for science *sigh* – if this was a life animal I might have gotten my face full of dung or egg] that shows the foam pads nicely.
We did two shots the first time around. One during the day, with natural light (you can see the shadows under the feet of the skeleton), during which my partner in crime Matteo Belvedere and I took turns.

Photographing the inside of the rib cage is a special challenge, as it is hard to put the camera on a tripod (which had worked well before for the overview images of Dicraeosaurus– images to come). First of all, you need one hell of a big tripod, then it has to be set on foam mats, too, and the ribs and the lamps in the floor and the feet and the hips… make it hard to put the tripod in all the locations you need it. Also, while a tripod allows long exposures, so that having sufficient light is not an issue, it doesn’t help with getting the recesses, nooks and crannies of the skeleton light properly. And dark recesses lead to holes in photogrammetric models, and that is the last thing we wanted. Thus, as I always do if I can, we used a ring light (a ring flash also does the job), as it gives lens-parallel light. This means that the images have no shadows on them, and that recesses are well lit. Personally, I prefer a LED ring light to a proper flash (but some of my colleagues vehemently argue for a proper flash), because it is not that heavy, and gives out a constant light. This makes it easier to shoot rapidly and without worrying about the exposure, as I can can use the auto-exposure mode of my camera. The drawback is that the amount of light it gives out is fairly low, so that I need to get close to the object I photograph. Which isn’t a problem when I want to create a high-resolution model, as I need to get close anyways to achieve sufficient resolution.
Still, this means hand-holding a hefty DSLR with lens and the ring light at arm’s length for hours at a time, which can be quite exhausting. Doesn’t take the fun out of the project, though.
Now, it wasn’t me alone doing the shoot, so Matteo and I could spell each other. But that doesn’t mean that one of us could laze around half the time as he pleased. The rather rickety ladder support meant that most of the “off” time was spent like this:

Booooring! You get to spend hours at a time watching your colleague’s butt sway around a dinosaur 😀
The last photo shows the second, night-time data capture session. You can see that even the dinky LED ringlight gives quite a splash of light on the skeleton! This shot was at the height of a summer heat wave in Germany, and despite only wearing shorts and T I was sweating profusely, to the point where holding the camera was a challenge because my hands were so slippery. Also, I had to wipe my brow all the time to keep sweat from trickling down into my eyes. High time the Museum für Naturkunde gets air conditioning – not just for comfort, but to protect the exhibit specimens!
So, did it all work out smoothly? Far from it! This project was a major pain in the rear end, simply because of the complexity of the capture process and the humongous amount of raw data we had to handle. Also, the mounted bones proved a bigger challenge in many respects that I had hoped. For example, many bones reconstructed badly because they are partly hidden from view by other bones. We can see a lot of their surfaces that a photogrammetric model cannot capture too well, because we can peer into deep recesses, but it is difficult or even impossible to get several photos of the surfaces in the recess at not-too-shallow angles. Think, for example, of the acetabulum and the femur head in it. We can easily look into the gap, but despite trying really hard my models would only show about half of the femur head surface in acceptable quality.
Additionally, for really high resolution models it is important to capture the surface at high resolution, which means taking a lot of images with small offsets and angles between camera positions. Now comes another bone, one that articulates with the one I am digitizing, and hides a big chunk of it – say, worth a 20° angle. My chance of photos of one part and those on the other on the other side of the obnoxious interfering bone aligning well is not too great. In fact, this turned out to be a major issue! Obviously, I can just digitize the two bones together – but then we are talking project with some 2000 to 3000 images in one model! EEK!!!! Calculation times of several hundreds of hours are a major drain, but if that’s for uncertain gain…….. I tried a different, much faster software, Reality Capture (from which is the Giraffatitan model above), but it has its ow issues. Among them it demands very small angles between images, which makes the issue of one bone hiding part of another even more of a problem.
And as if that wasn’t enough to deal with, the mounted bones all have been treated lavishly with a wide variety of glues and lacquers (remember, most were originally prepared a century ago!), making them quite shiny. Baaaaad for photogrammery! And their upper sides are all rather dusty, which – like shininess – induces a color change depending on te angle you photograph them. UGH!
Thus, a lot of models failed or at least didn’t work as well as I had hoped. With the new, GPU-supporting version of Agisoft Photoscan out now, and the MfN IT wizard having re-shuffled a lot of the CPU and RAM and GPU at his disposal, I will run a bunch of model again and expect to get good results. But…. it’s been a bother.
Anyways, overall this was and (contra planning) still is a fun project, made possible (I should mention again) not by some palaeontology-related grant, or by the MfN’s (already overstretched) budget, but by the state of Berlin funding digitizing initiatives with the explicit aim of making assets accessible. So do expect our scans to go online at some time, hopefully soon!

I, for one, cannot wait!
Wow! Do you have an exact final count for the number of photos that went into this model?
So very much awesome!
Your guides on photogrammetry have been extensively helpful for my foray into this realm. Thanks a ton. Could you please also do a brief piece into how you are using the ring flash and if you’re using polarisers with it.
Great Work as usual! I learn so much from your tutorials! I and many ocean scientists thank you!
Pingback: I Know Dino Podcast Present Notes: Masiakasaurus (Episode 127) - 1 Cat 2 Dogs
Pingback: I Know Dino Podcast Present Notes: Masiakasaurus (Episode 127) - Geni TV
Pingback: I Know Dino Podcast Present Notes: Masiakasaurus (Episode 127) - Angela
Pingback: I Know Dino Podcast Present Notes: Masiakasaurus (Episode 127) - Ava Addams