
So far, most of my photogrammetry efforts have dealt with specimens in the several centimetre to meter range. Bones, skulls, entire skeletons. The smallest models I created were of ammonites – more on that currently on-hold project later – with diameters of several centimetres. “several” here meaning more than 4, i.e. 40 mm. That’s a range where my kit 18-135 mm lens is hard pressed at the lower end, because the specimens are so small on the image that the alignment in Photoscan often fails unless I let the program use the image background. And that causes further bother later on if I need to digitize a specimen in 720°, as I call it: 360° around horizontally, and also all around (another 360°) vertically – a specimen that I want to capture the “bottom” of, too. In contrast, a specimen embedded in rock would be only 360°, because I do not wish to digitize it from below.
If now a specimen makes up only a small part of each image, its surface isn’t well resolved in them, and Photoscan is hard pressed to find features to correlate with other images. That means that I can’t just mask the background out of all images and toss them all into one chunk for alignment, because the angle difference between many images will be too big for Photoscan to work it out based on few matching points.
Quite the obvious solution is the use of a macro lens. Which requires having a macro lens. And that’s as far as I got – until Wednesday! Here’s how I got by a macro lens and what I did with it:
Obviously, the MfN photographers have a lot of very nice kit lying around. But I can’t just barge in and ask to borrow stuff whenever it suits me, after all they need their work tools as much as I need mine. And it is not just a matter of borrowing a lens, because they use Nikons and I have a Canon. Thus, I would have had to borrow and lens and a camera. Not good. Therefore, we planned to test macro photogrammetry together this summer. However, my esteemed colleague Matteo Belvedere recently did a cool project that we will report on at our DigitalSpecimen 2014 conference, for which he used a macro lens. And he told me that he had borrowed the required macro lens from colleagues at the museum. Obviously, I immediately grabbed the phone and organized a loan, so that I can run a few tests before I meet with our photographers. Just to make sure I do not make a total fool out of myself at that occasion.
It turned out that my colleagues actually have two macro lenses that fit my Canon, a Canon EF 50 mm lens and another one that I will simply call The Weapon – a Canon MP-E 65 mm lens. Today, I’ll only show you some stuff I did with the former, but rest assured that you will be amazed by what I did with the latter!
Let’s start with an ammonite…
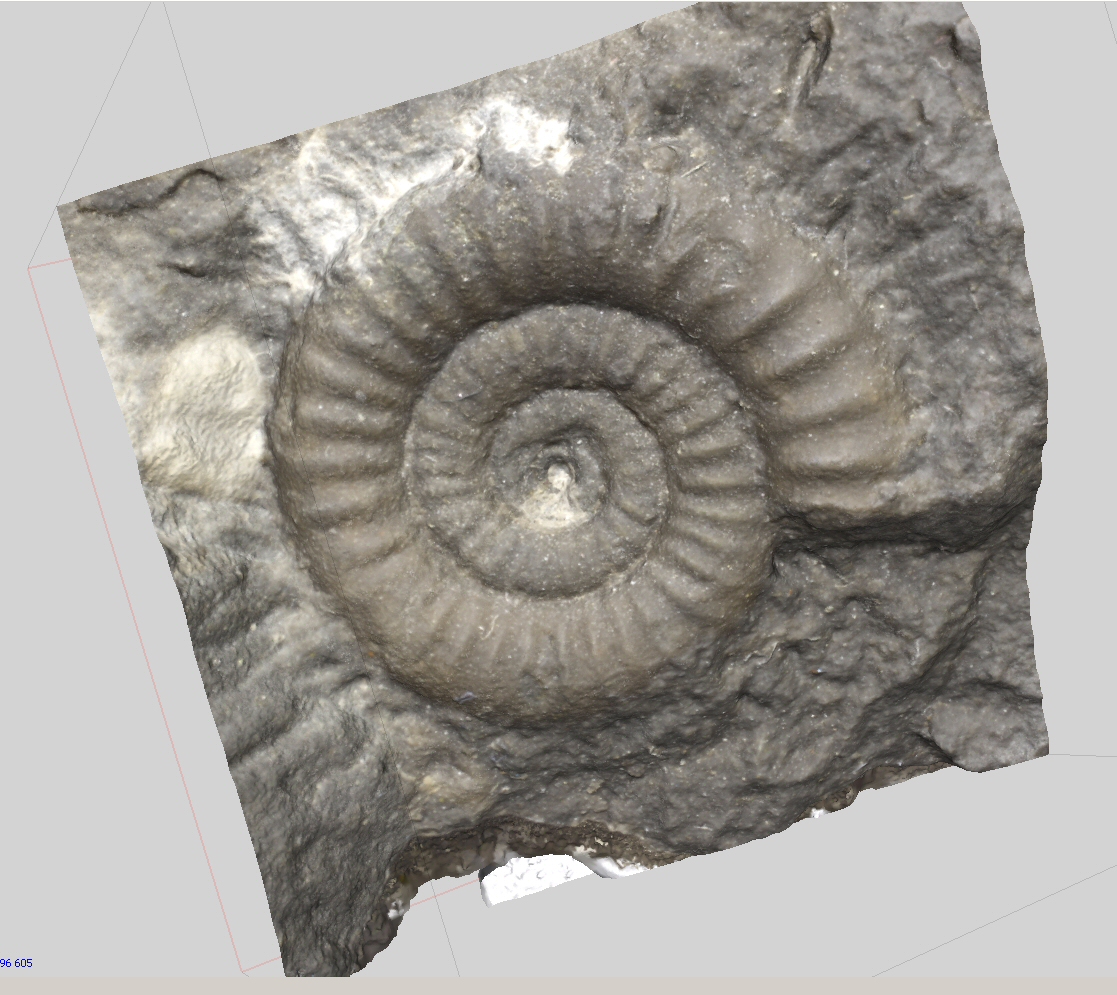
Doesn’t look very special, does it? It is a genus and species I forgot (oops!) from the Lias alpha 3 near Balingen in southern Germany. The kicker: it is less than 15 mm across, but the model as you see it has over 5 million polygons! Here’s a photo from the set that produced the model:

That was taken with the 50 mm macro. I love that lens! For a current cost of under 300 € you get a great, high-quality 50 mm lens and a macro capable of 1:2 enlargement (i.e., depicting things half life size). However, it is beginning to show its age; for roughly double times the price you can by now get 1:1 macro lenses with an image stabilizer etc. and sometimes better image quality.
Anyways, this test showed me that macro photogrammetry can work extremely well. Further tests immediately followed. I picked more specimens from my private collection, first of all a fossil pine cone. Once upon a time I wrote my diploma thesis on fossil pine cones from the Oligocene of Germany, and finally re-doing that work and getting it publishable has been on my mind on and off for the last decade. Here’s one of the cones.

This one is of a rare variety because it is coaly. Most cones are actually pseudomorphs of baryte into the cone shape, with some limonite (goethite) mixed in to colour them brown. In plain English, the baryte (yes, barium sulfate! weird, hu?) takes the shape of the cone.
I don’t remember off the top of my head what extant pine the cone above is most closely related to. The point of all this cone stuff is that you can determine the species the cone comes from by the shape of the external sides of the cone scales. Both the shape of the tiny raised area in the middle, called the umbo (navel) and the area around it that corresponds to the growth of the cone after pollination have many characteristic properties. There’s a whole lot of literature on that topic. In essence, if you have a well preserved cone scale, and roughly know where on the cone the scale was located, you have a good chance at determining the species. Obviously, comparison to extant pines plays a big role in this.
So the task one has to do is to take a close look at the cone scales – sounds easy! Just grab a good magnifying glass and you’re all set….. but no! Especially the blackened coal cones, but also the brownish non-coaly ones, make it very difficult to really determine the finer structures. Also, there is some damage on the fossils, and it can be really hard to figure out what some little nub on a scale is: a thorn or just a broken bit, or some discoloured sediment that wasn’t prepared off?
And here, as often, 3D digital models are a great help. Not only do they hold still while you study them (yes, cones tend to roll very well), but also you can remove all colour from them. As a consequence, the colour will not camouflage shapes the way it often does – guess why people use camouflage paint! With extant pine cones colour will usually either help your or at least not distract you, except for the fact that the scales are often shiny enough to mess with you when you us a strong binocular (low-magnification stereo microscope – it is weird that there is no unambiguous English word for this very common class of tools) on them. With fossil ones….. let me just say that it would have been cool to have the option of seeing the cones I studied in monochrome. lLet me show you:

Extant pine, cone scale in macro view and…..

3D model calculated from a set of photos the one above is part of. Now tell me: how well did you see the tiny thorn in the middle on the photo above?
With fossils…. well, here’s the fossil cone shown above again, but now as a 3D model made with Photoscan. Here, the details come out much better than on the real fossil 🙂

More to come on the cones! Their taphonomy is an interesting story in its own right, and one day I hope to really get the flora described properly.
As for photogrammetry with a macro lens, there are obviously a few things one needs to keep in mind. Overall, however, the method works just fine with any kind of photo you can toss at it. Good news for researchers who want to study the outside shapes of tiny things in detail 🙂

Very nice
Pingback: PHOTOGRAMMETRY IN PALEONTOLOGY – A PRACTICAL GUIDE | dinosaurpalaeo
Pingback: A more detailed take on Pinus macro photogrammetry | dinosaurpalaeo
Pingback: Attempts at macro photography of minerals | dinosaurpalaeo
Wow that looks incredible! Was it hard to keep consistency throughout using the macro lens?
I am trying different imaging techniques for analysing cut marks and SFM is one of them, but I don’t know how they are going to come out with a ‘normal’ lens. Macro might be needed!
Sian, this was easy, as I had the camera fixed and manually moved the specimen. Thelive view screen with 5x zoom was very useful for judging focus.
Hi Heinrich! Great work 🙂
I’m attempting to do the same with a micro-moth’s cocoon. I’m having some trouble aligning due to the short focal length – do you have any tips on how to circumvent that?
Paula, for something really tiny you may need focus stacking, and then “fake” the EXIF data. However, it may suffice to shoot every photo twice, once focusing on the “back” of the object, once on the “front”.
Good idea. I wasn’t sure how the software deal with unfocused photographs, but my guess is not good. I’ll try focus stacking! Thanks!
“And it is not just a matter of borrowing a lens, because they use Nikons and I have a Canon. Thus, I would have had to borrow and lens and a camera.”
Seriously? The camera/lens interface is not standardised? In 2017?
Why would they standardize it?
You can buy adapters, though. However there is a fundamental difference: one has the AF in the lens, the other in the camera. Two fundamentally different systems, which is why mixing is not a smart idea.